Thursday, July 21, 2011

Update to Scallop Template

I was thinking about Hiroyuki's 'connect the dots' script, and was wondering, what happens if you have a reverse need, where you have a spline, and you want to distribute an object across all the anchor points.


I remembered I had written something like that when I made the Scallop Template script, but I dialed it down to only sharp corners, because it seemed silly to put a scallop in the middle of a rounded segment. I have now updated scallopTemplate.js with the option to draw a circle around sharp corners only, or around all anchor points.

If you have a line graph, you can use scallopTemplate to drop circles over the anchors like this:


If you then ungroup the circle objects, you can  then use copyToMultipleObjects to replace the circles with whatever object suits your fancy...

If for some reason, you don't like the extra click, and plan to only use one or the other, you can edit line 26 of the script from:

var selectAll = confirm("Scallop corners only?");

to

var selectAll = true;
Have fun!
-J

Showcase: Scott Daris

Hey All,

I got a wonderful email from Scott Daris, a graphic designer who is using my scripts for a variety of designs ranging from editorial illustration to non-profit work. Upon request, Scott was kind enough to send me some examples of his work.

I like seeing what people do with my scripts, and hopefully you do too, because I'm posting them here.

Scott used vary_hues.js to quickly turn this collection of grey blocks:


...into this one:


In his words:
I used it for quickly colorizing the squares in the buildings for a little editorial illustration. I know you can achieve this effect in other ways, such as object mosaic, Recolor Artwork, etc, but your script was great because I quickly did a bunch of them, automatically randomizing the colors so each one was different, and then just picked my favorite one. Easy!

Scott is also a fan of textTweaker.js, which he used as a starting point to add a playful feel to the typography below, creating cool blocks of text that ooze with personality.


I hope these use cases inspire you, as they inspire me, to create something new.

cheers,
-J

Monday, June 13, 2011

Connect the Dots II

Hiroyuki posted an update to the connect the dots script, which sets a maximum difference between connectors. 

This allows for some REALLY COOL stuff.


I found a copy of a voronoi stipple program similar to the one mentioned, which makes VECTOR pointallized svgs using the command line. (these CAN absolutely be loaded by Illustrator) 


The advanced options didn't seem to work for me on initial try, but after opening a 'cmd' window and navigating to the containing folder, the following ran fine, although it took about 3 minutes to finish.


voronoi.exe test.png out.svg

I also ran across a really neat way to take things a step further using a Traveling Salesman Solver python script for Inkscape at the EvilMadScience site. I didn't try this one because I don't have inkscape installed, but after seeing that you can write scripts for it in python, I might just take it for a whirl...


Anyway, cool art abounds. I am in awe. 

Thursday, June 02, 2011

Distribute Stacked Objects to a grid (sort of...)

Hey All,

New script goodness!!!


Distribute Stacked Objects is a script I cooked up to take any number of selected objects, and spread them out a bit.  The script doesn't create an exact grid, but it does prevent objects from overlapping, which is handy if you've just imported 50 .eps icons. Take it for a spin and see if it improves your quality of life. I've tested it on CS5 for Windows.  Good luck, and happy illustrating.

right click here to acquire.

cheers,
-J

Saturday, May 28, 2011

Connecting the Dots

Hiroyuki just posted a new script that connects the dots, literally. It draws a line through the centers of a collection of selected objects with options such as nearest horizontal, nearest vertical, nearest, farthest, etc...


I haven't played with it yet, but it looks like it could be a really fun toy, and possibly even a handy visualization tool.  I'm going to run it on a few of my latest logo projects and see if I can get it to do something unexpected.  Post in the comments if you find an interesting way to use this script. Mad props to Hiroyuki, dude, keep on script'n!


Saturday, April 16, 2011

Save Layer States

OK, here's a really quick shot at saving layer states.

The script doesn't track by layer name, so if you add or remove a layer between uses, your layer visibility will be shifted. Fortunately, I'm using a simple system of 1's and 0's to track visibility, so you can easily edit the saved values if you added or removed a layer between runs.

Another limitation/caveat: This version doesn't look at sub-layers, just top level layers.

Someone who know how to write plugins should probably write something like this, but until then, if you're dying for a layer "save state" script, this should get you started.

Just run the script posted below and a prompt will come up with a bunch of ones and zeros in the text entry field. These represent the visibility of each root layer in your document. If you want to save your layer state, just manually copy the prompt data to a text document for use later.

When you want to reset your visibility to an older saved state, just rerun the script, and paste your saved string back into the prompt window, (erasing the existing data) and your layers will return to the original visibility settings.

Enjoy, and if you have any suggestions, requests or improvements, please email me, or post in the comments below.
 cheers,
-J

var doc = activeDocument;

var binArr=[];
var i = 0;


for(var d=doc.layers.length-1;d>=0;d--)
{
        i= doc.layers[d].visible ? 1:0;
        binArr.unshift(i);
}

var p=prompt("Copy values to store layer visibility states, paste new data below to change.",binArr.join(""));

if (p!=null)
{
    binArr = p.split("");
    for(var d=binArr.length-1;d>=0;d--)
    {
            if(doc.layers.length  > d){
                doc.layers[d].visible  = binArr[d] ==    0   ?  false : true;
            }
    }
    
}

Thursday, April 07, 2011

Quick and Dirty Label Layers

Here's a simple script I wrote to auto-label layers. It will only label the layers of objects that you've selected, and it will only label a layer if the object has a name, or is a placed image with a image link.
If an object has a name, that will take priority over the link name.  I might make this an official script, but meanwhile, take this for a testdrive. Just copy the script below and save it as
AutoLabelLayers.jsx
It should work cross platform.  Let me know how it goes...

cheers,
-J


// AutoLabelLayers.jsx beta JS4AI script by wundes.com
var doc = activeDocument;
var sel = doc.selection;
var selLen = sel.length;

//prevent renaming of existing layer names.
var renameLayers = true;

for(var x=0; x<selLen;x++)
{
    assignLayerName(sel[x]);
}
function assignLayerName(obj)
{
    var imageName = getName(obj);
    if(imageName != null)
    {
        var layer = obj.layer;
        while (layer.parent.typename=="Layer")
        {
            //name all layers up the layer tree:
           //layer.name = imageName;
            nameLayer(layer,imageName);
            layer = layer.parent;
                
        }
           nameLayer(layer,imageName);
     } 
}


function nameLayer(_layer,_name)
{
        if(   (_layer.name.indexOf("Layer ")  == 0)  ||   (renameLayers == true)  )
        {
            _layer.name = _name;
        }
}

function getName(obj)
{
       if (obj.name.length>0)
       {
           return obj.name;
        }
   else
   if(obj.typename == "PlacedItem" || obj.typename == "RasterItem" )
    {
        var nString = obj.file.toString();        
        var fileDiv="\\";
        if(nString.indexOf("/")  != -1)
        {
            fileDiv = "/";
        }
        var nArr = nString.split(fileDiv);
        var nString = nArr[nArr.length - 1];
        if(nString.indexOf(".") == nString.length-4)
        {
            nString = nString.split(".")[0];
         }
        return nString;        
    }
return null;
}

Monday, December 20, 2010

PURE CHAOS

Once again, Mr. Van Willigen has been busy making some pallatey goodness. Daniel promises that this will be the last new script this year.  (Which hopefully means that we'll see some new stuff from him in January.)  Here we have some very organic looking conglomerations of randomized shapes with lots-and-lots of configurable options. Add it to your arsenal of drawing tools. I bet you could do some cool stuff pairing this with my organify script...

You can download  PURE CHAOS here.  And yes, this time I actually checked the link before posting. :)

Happy holidays all!
-J

Monday, December 06, 2010

I don't know if Daniel is planning to write a scripting book or something, but he's well on his way with the examples he's pumping out.

Check his latest script "Spiral" which does what it says, but with an effluence of  configurable options.  Backwards compatible to CS3.
Rock on Daniel!
-J

Tuesday, November 30, 2010

Flip an object

This morning, Steve from the UK wrote me and asked me how to run a "reflect x" command on an object using JavaScript.
I assumed this could be solved with a simple command, such as in ActionScript, where you can write "scaleX= -1", but after peeking through the docs, I couldn't find any "scale" properties on the objects.

I found the answer in the matrix object (found on page 99 of the CS5  Javascript scripting reference)
For  convenience, here's an example code to flip every object in your document along the 'y' axis: (reflect x)

if ( app.documents.length > 0 ) {

    // here's the "flip horizontal" magic:
    var totalMatrix = app.getScaleMatrix(-100,100);

    // apply the transformation to all art in the document
    var doc = app.activeDocument;
    for ( i = 0; i < doc.pageItems.length; i++ ) {
        doc.pageItems[i].transform( totalMatrix );
    }
}

cheers,
-J

Sunday, November 14, 2010

More from Daniel Van Willigen

While I've been busy playing with Flash and Actionscript, Daniel has been busy writing new and improving existing scripts. Now everything is CS3 compatible. See the link at the bottom of this post for a zip file of everything mentioned here.

Daniel's sent me the boxit script and circleit scripts from last time, and now has some new ones as well. There is starit, smileit, and blowfishit which display the respective critters in purdy geometric arrangements.

He has a cool customizable wave generating script called Totally Twisted.

Also included in the zip is his Trace vector to script which he used to create some of the above scripts. Check out his "blowfishit" script as a cute example.
All of the above lovingly zipped into a convenient bundle for your perusal here.

cheers,
-J

Friday, October 08, 2010

New Scripts from Daniel

New Scripts from Scripting Rock-Star Daniel van Willigen.


Daniel has written two brilliant scripts, boxIt.jsx, and CircleIT.jsx that generate fun "eye-candy", but if you look at his code, it is very instructive and clean as well.

 He has also found a great way to utilize dialogs, which I will be emulating in my future scripts.
If you are a designer, or a coder, I recommend you download and check these out.

I have been so lax in my blog updates, that in the meanwhile, he has written ANOTHER brilliant script that will take any geometry on the page and will EXPORT it as a new JavaScript so you can dynamically create that geometry inside of your new script.

Without further ado... Check it..

Oh yeah, I wrote something simple too, check the updates on my scripts page. :)


best,
-J

Tuesday, July 27, 2010

News

No new scripts from me today, but a lot of cool info.

After a brief email volley with Nathaniel Kelso, I checked out Kelso's Tweet's and he's found some killer posts that I want to remember, so I'm putting them here. Hopefully you might find some value as well.

If you want to export artboards as pngs check this cool  link at hicks design.

Scripting tip here for storing script settings or information in the doc or prefs file, 
Both app and document in CS3 have a  insertLabel() and extractLabel() see the details here.

If you're a fan of EditPlus, Adam Pocs has submitted JS4AI syntax files. Check out the site to grab the syntax files.

Also from Kelso's tweet's, I found a cool scripting tool called ScriptBay on inTools website. Check it here. I'll be playing with it and will post any interesting interactions that occur. That's it for now. Happy Scripting all.
-J
 

Sunday, June 27, 2010

Cool Art

I got an email from Pócs Ádám (RoyalJerry) in Hungary, who has made some cool Deco patterns using Fleurify. I asked how he did it, and he emailed me a step by step on how they were made. Good stuff!

Check it, and the crazy Deco images below...


The procedure:

Illustrator part
  • Draw a circle (square, octagon, anything, that looks good and symmetrical considering each axis if you rotate the image with 22.5 degrees)
  • Wundes / Fleurify with (mostly every time) more than 100
  • Pathfinder / Divide
  • Ungroup
  • Wundes / ArcTwister (now you have to experiment with it, sometimes undo, then again...)
  • Group all
  • Apply style: appearance with a 3pt white stroke and a 9pt black one
  • Export as PSD (surely you can flatten the image, the PS-part is based on whole layers, not just the illustration outline)

Photoshop part
  • Open as RGB and if it is not flat, flatten the image (so that the background would be white against a black illustration)
  • Create a layer from the background
  • Duplicate it
  • Rotate the duplication with 45 degrees
  • Set it to difference blend mode

That's all. I sometimes played with a "double-set" -- that means I duplicated the whole layer set in Photoshop once again, merged them, rotated with 22,5 degrees and set its blend mode back to difference.
Jerry has some other cool images on his blog. It's in Hungarian, so I don't know what it says, but I do like the pictures...

cheers,
-J

Thursday, June 24, 2010

Good news, exportLayers works on at least Snow Leopard. :)

BTW: Minor bug fix.
The toggle for layer name vs. number was backwards.

The current version posted is correct.
If you downloaded before the 24th just re-download the script.

cheers and happy illustrating,
-J

Sunday, June 20, 2010

Export Layers as Images


Hey script kiddies!

I know, I know... It's been a while. Hopefully this will make up for some of the lonely feelings you've had to suffer through.

Behold my newest creation: exportLayers.jsx


It will export as many images as you have layers in an .ai document.
And provides the option for you to process multiple open documents or just the current active document.


You can batch export images like this as PNG, JPG, or GIF with a single click:


just by creating a layer structure like this:


Make sure your static layers are locked.
All unlocked layers will be exported, regardless of visibility.
Layers that are both locked AND hidden will be ignored completely.

....and if that weren't cool enough...

The script also auto-generates a production script into your chosen images export directory, so if you ever need to re-run the batch, just re-open all the same source files, double click the .jsx file in your image export directory, and it will skip the dialog and re-export all the images with the same settings.

Happy Illustrating,
-J


Wednesday, May 27, 2009

New Version of Arc Twister

ArcTwister is reborn... Same functionality, but new interface. Now you don't need to install a separate SWF, and the dialog is better than v.1. New dialog looks like this:


And, like the swf version, the object(s) are adjusted each time you release a slider... Slick huh?

enjoy,
-J

Sunday, May 24, 2009

New Script "Extrude Faces"


Extrude Faces

Ta Dahhhh! A quick way to extrude selected anchors from a path object.
Just select a handful of sequential anchors with the Direct Selection Arrow (it's keyboard shortcut is "a" if you didn't know...)

When you run this script, it adds an anchor point at the beginning and the end of your point selection. This allows you to drag your selected points as if they were extruded from the pathObject.

This script was really a solution looking for a problem, I just wanted to see if I could do it.
Of course, sometimes these projects turn out to be the most popular...
If you find it useful, let me know. Check it.

cheers,
-J

Tuesday, May 05, 2009

New Script: allPoints

S'poze you have a shape like this, and you want to draw a line from every point to every other point. OK, no problem. Just turn on "snap to points" drop a few lines, and you're done in 10 seconds. But what if you want to do something a little more complex, or something a little MORE complex?
Well if you do, you're going to love my new little script allPoints.

This script draws all connecting lines groups them together. The original object is kept but is not included in the group. It works on any single selected path item, and it's really, really fast . . . even works on stars and objects drawn freehand.

So, enough babble. Get to it kiddies - make me proud.

Tuesday, April 21, 2009

"Size By Luminance" a.k.a. Halftones!!!

Download:SizeByLuminance.jsx

Want to make halftones in illustrator?

You could go the auto trace route, or you could go with a plug-in from Phantasm. The Phantasm plug-in is powerful and gives you great control, so I do recommend using their product, but if you're on a tight budget, you can try my new script which is easy, and free.

First off, if you don't know about the "Mosaic Filter" in Illustrator, read this quick article. The Mosaic Filter is an amazingly under-used feature and it will do most of the heavy lifting for us today. 
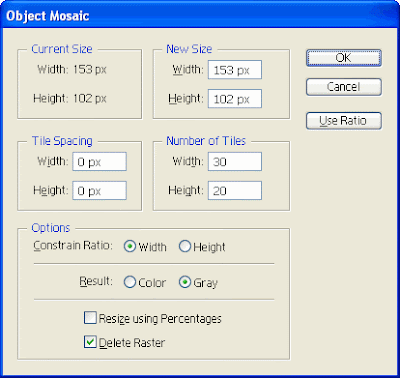
Filter>Create>Object Mosaic

I will review the steps, but the above link is a detailed and well illustrated walk-through of how to turn an embedded image into an "object mosaic". (a pixellated looking collection of path items). You can mess with the settings, but be sure to check "Delete Raster" or at least remove it manually before running my script.


So, first of course you need to find an image. The image I'm using here is iStock_000008518543.jpg from iStockPhoto.com.


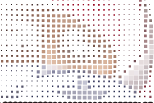
Note: You'll get a better result if you "pre-pixellize your image in Photoshop, but if you're just goofing around with this tutorial, you could just skip that step and embed your image directly into illustrator and apply Filter>Create>Object Mosaic.
Be sure to actually embed the image, and not just link to it, or this step won't work.


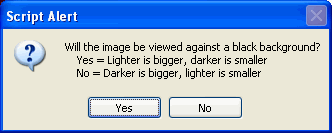
Now, just ungroup your new Object Mosaic , select all the pieces, and run my "Resize on Luminance" script and decide if you want your image to be against a black or a white background.


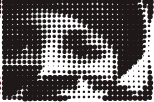
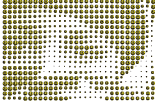
(The script doesn't actually add the background, it just reverses the dot sizing, see the images:

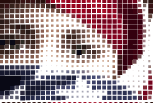
This is the result for the image processed for display against a white background.


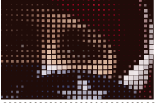
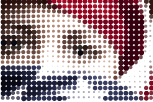
This is the same image but processed inversely. Not so pretty now, but watch what happens when we drop it onto a black background.


Tada... Magic.. Ok, now you get the process I think, let's move on.


When you hit enter, a progress bar will come up and you can probably go get yourself a cup of coffee. The demo image here was a 20x30 pixel object which contained 600 pixel elements. On my machine, that took a good 25 seconds. If you have a 100x100 pixel mosaic, you're looking at ten thousand objects, which will take the JS engine quite a bit longer to chug through.

Really, that's the end of the tutorial, you can experiment from here. You could convert all the objects to circles using Effect>Convert to Shape>Ellipse,


You could select all the pixels and turn them black (or white if that was your choice)


Since the image data is now based on Size instead of color, you could even run my copyToMultipleObjects script and replace all the pixels with a Symbol.


Pop me an email if you use the script in any cool projects and I'll link to you in my new twitter feed @JS4AI. :)

cheers,
-J