Thursday, January 31, 2008

Flash Panel Installation (issues)

I've been running Organify2 and ArcTwister side by side now for a couple of weeks, and I am loving the added flexibility they offer in my production. 
 
I very much want to transition all my scripts to the new Flash Panel format, but I've run into a few issues along the way.  Personally, I think the panels are well worth the headache,  but I'm afraid the average user may give up early because it's not one-click simple.   I will go over the details here, so you'll know what to expect, and what to do about it.
 
Panel installation is generally as follows. You put the .swf file in your scripts directory, and put the .jsx file anywhere you want, outside of your illustrator folder. (I'll explain why below.) You may then double click on the jsx file to run the flash panel. Now, on to the issues...
 
1) When running a .jsx script outside of the scripts folder, Adobe pops up a warning:
 
You are about to run a script in Adobe Illustrator CS3. You should only run scripts from trusted sources. Do you want to run the script?
I don't understand how the panel is any more of a threat than any of the files in the scripts folder that illustrator DOESN'T warn you about. Illustrator should at least give the user the chance to "OK" the file so the app doesn't pop up a warning dialogue each time the script gets initialized. 
 
2) If this is your first time running the script, then you'll get ANOTHER warning:
 
 Adobe Flash Player has stopped a potentially unsafe operation.

The following local application on your computer or network:
/Application/Adobe Illustrator CS3/Presets.localized/.../FlashPanelInQuestion.swf

is trying to communicate with this internet-enabled location:
<unknown>

To let this application communicate with the internet, click Settings.
You must restart this application after changing your settings.
 
If I were an end user, that would scare the piss out of me. "What does it mean? What is it trying to do? Ack! spyware, virus, Trojan, worm, rootkit oh My!!!"
 
I don't know why this warning comes up, and I don't know what the swf is trying to communicate with that is so scary since flash ITSELF is an "internet enabled" program. Regardless, it brings up the Flash Security Settings Page" in your browser, and you can set the script (or directory) as OK to run.  Now, finally, you should be able to instantiate your flash panel.
 
"So then why not just run the script from the script directory, like you're supposed to?",  you ask...  Well, if you run the file from the script directory, then you can only run a single flash panel at a time. When you try to launch a second panel, you'll get the alert:

Error: FlashPanel is already running

Starting the panels by manually double clicking on the jsx files outside of the illustrator directory bypasses the issue. You'll get the "You are about to run a script" warning, but now you may create as many Flash panels as you like. In fact, you can run multiple copies of the same panel, although I'm at loss right now as to why someone would want to. I know there is a way to run ALL your panels in the same flash meta-panel, but in my experiments, there is no simple way for users to attach individual jsx files.
 
Today I got all excited about automatically launching panels at startup, which works fine for normal .jsx files, if you create a "Startup scripts" folder in your main Adobe Illustrator CS3 directory.  Unfortunately when you do this for a flash panel, the panel is instantiated as a separate window from the main illustrator app, so when you click on your document, the flash panel disappears behind the Illustrator application, rendering it more of a pain than it's worth.  And to further ensure that the panels never get used in this way, as I mentioned above, you cannot put more than one flash panels' .jsx file in the startup scripts folder, otherwise you get the "Error: FlashPanel is already running" warning.
 
If you've made it this far, and you're still interested in using the flash panels, then the worst is over. The last point in this list is just a minor nuance that you will want to know about when using the panels.
 
3) When the panel is focused, Illustrator is NOT.
This is frustrating in that the flash panel does not work like other palates in illustrator. If you click the panel, then the panel has focus. You can use it to manipulate the art in Illustrator, but you cannot use keyboard shortcuts until you return focus to your document. This is most noticeable when you want to undo a transform using Cntl-Z. You can still undo anything done by the flash panel, but not until you return focus to the illustrator app. (by clicking on it) A minor annoyance, but hardly a show stopper.
 
Now you know what I know about installation issues. I will add notes to the "comments" section of this post if I run in to anything new.
 
I'll end on a positive note.
One never knows how ones actions will effect the world, (unless of course they send you emails and tell you.) ... (Hint, hint...)
I've gotten feedback from some people using my scripts in the medical research field.  It is a tremendous inspiration to me that in some small way I am able to contribute my skills towards scientific discovery. Thanks for the positive feedback.
 
as always, happy Illustrating...
-J

Friday, January 25, 2008

Updated: joinTextFrames

I got a letter from India the other day requesting this one.

JoinTextFrames V2.0 now copies formating from the source letters, so superscript text will stay superscript, larger letters, stay large etc...
Also, positional values are now compared from the textFields anchor points rather than from their boundaries, which means superscript will end up where it's supposed to.

Wednesday, January 16, 2008

Making Gears

I was reading N. Kelso's blog, which lead me to Mordy Golding's excellent Illustrator tips blog, which lead me to Veerle's blog, which lead me to her article on making gears in 6 steps. In the comments there were several excellent alternate ideas, and I thought I'd throw in mine here (since that thread is no longer accepting posts...)

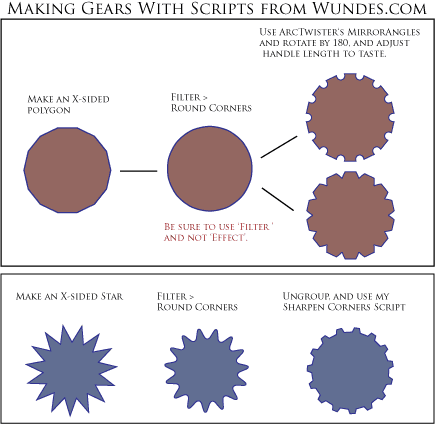
There are 3 basic cog styles that I can think of, I've illustrated how to make each here:


For the first 2 Gears:
Step 1) Create your base regular polygon. (Use arrow keys while drawing shape to adjust number of sides.)

Step 2) Use Filter > Round Corners. Be sure to use the "Filter" menu, if you use Effect > Round Corners, my scripts won't work, because the base geometry hasn't changed.

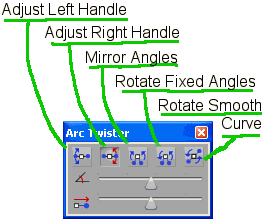
Step 3) Open my ArcTwister panel, select the (top middle) Mirror Angles button, and adjust the top slider all the way to the left twice. This should rotate all angles by 180 degrees. Now just use the bottom slider to adjust the length of the handles between rounded and straight teeth. Note that on the second gear style, the number of points are the same as the gear above it, but the handle positions give the illusion of extra points.

Hopefully, after reading the above steps, the illustration above should be enough to help you create the third gear, but if I've overlooked something crucial, please leave a comment and I'll fill in the missing steps.

So there you have it. Now you can create any of the three styles of gears in three simple steps, not counting installation... :)

Friday, January 11, 2008

Organify & ArcTwister for a Better America


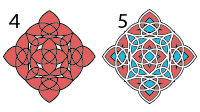
This post is a tutorial for turning a simple circle into this awesome pattern:

If you can draw a circle in illustrator, I promise you that, by the end of this tutorial you will be making stuff like this without breaking a sweat.
The key players are the 'fleurify' button from my organify2 panel, and the 'mirror angles' button from my new ArcTwister panel. If you have these installed, lets get going. If not, you should be able to get them both from the 'Javascript Flash Panel' links on the side of this blog.

OK, let's get to it then shall we?

Step 1: First, start illustrator CS3 and create a blank document. Use the draw ellipse icon on the tool palate to draw a circle. You can use any rounded shape you want, but this one was done with a perfect circle. Now assuming my aforementioned panels are downloaded, drop the swf files into your scripts folder (see included read me in the zip files for detailed instructions) and double click on both jsx files to bring up the new palates.

Step 2: Select your circle and click the 'fleurify' icon on my organify2 flash panel. You will have to adjust the numbers a bit to get the shape right (see below) but I think the right number is close to 100.
You can also make minor adjustments to the angles of the curves by clicking the 'mirror angles' button on my ArcTwister and moving the top slider a few pixels to beef it up a bit. Experiment with both sliders and see what it does to the shape. Use small increments at first... Remember, if it gets too out of control you can always re-fleurify your object to restart at the beginning of step 2.

Step 2.5:

(This one isn't illustrated, but there is no visual change.)
Use the 'Divide' tool located on Illustrators 'Pathfinder' palate to break the shape apart. When this is done your art wont look any different, but you will have broken your single shape into 9 individual objects. You will need to ungroup (control+shift+'g') the divided objects now before proceeding on to step 3. You may have to click on the group first to get focus if you've been playing with the swf palates.

Step 3: Now select all your new objects and run 'fleurify' again.

Step 4: Use ArcTwisters 'mirror angles' to adjust for aesthetics. I adjusted the triangles separately to get everything to look uniform.

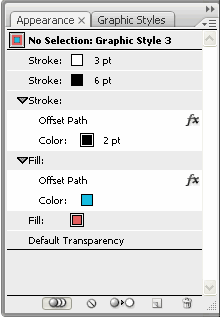
Step 5: Ready for the magic? Regroup everything and remove fill and stroke. Now when you apply a style to the group, the separate objects are visibly merged. Open your appearance palate; it should show that your object currently has no stroke or fill, so add some.
Use the flyout menu on the upper right of the palate to add new fills and strokes to the group object, or you can just duplicate your existing (empty) fills and strokes. Make sure the heavier weight strokes are behind the thin ones or the thin ones wont show up.

You can easily create your own style this way, but here is a screen shot of my appearance palate if you wish to recreate the style for this tutorial.

If you want to be lazy about it, (as I sometimes can be) you can just download it here with a couple other neat styles I made, but I encourage you to make it yourself so you know what's going on.

What you see on screen should closely resemble the image at the top of this post. If so, my work here is done. Now repeat the process with a hexagon and see what you end up with. :)

If you're still reading, then you have reached the end of this tutorial, hopefully you're not sweating too profusely yet. I hope this tute has been helpful and has provided you with a few ideas to play with. The palates have lots of other neat buttons to press, so go see what happens next, and, as always, have fun!

cheers,
-J

New Goodies: ArcTwister

I'm pleased to announce the emergence of ArcTwister.

This interface allows the users to adjust all the selected handles in an object and manipulate them in the same way.
Rather than show you how it works, I will let you get to know it by experimentation. I think it will do a pretty good job of explaining itself. This script only works on objects with anchors that are curved, so using it on a square isn't going to do anything. A circle, or rounded rectangle is a totally different story however...
The Arc Twister panel plays well with my other organify2 panel, however if you install two jsx flash interface scripts to your scripts folder, Adobe won't let your run them at the same time.

If you install only the .swf files to the scripts folder, and then run the jsx files (by double clicking on them) from any other location then Illustrator pops a warning, but they run perfectly in tandem. I'm sure Adobe is still working out the bugs on this system, but it's still really cool.

So far I've used the panel to make really quick scalloped edges by flipping the curves on rounded rectangles, but the fun doesn't stop there. Play with it a bit, the rabit hole just keeps going, and I'm not far enough down yet myself to tell you everything it can do. I'll post a tutorial in a bit for another fun application of the Arc Twister, meanwhile, see what you can make it do...

enjoy,
-J

Thursday, January 10, 2008

Imbedding Newlines in Interpreted Javascript

I've got a few new flash interfaces coming up. Unfortunately my hosting company has been down for the last week, so I can't upload anything yet... Grrr!
Meanwhile, in the course of my projects, I've discovered a simple but awesome javascript hack... OK, it's probably common knowledge in the Javascript community, but for this purpose I was stumping on the problem, and now I've figured out a workaround, so yay for me, it's my blog and I'll call it an awesome javascript hack if I want to, cause it sounds better and it makes me look smart... Is this thing on???

When writing jsx files for the flash panel interfaces (see my previous post for an example) one is required to imbed the entire script as a string, in the form:
"var a= 'Hello';\n"+
"var b= 'there';\n"+
"alert (a+' '+b+'!');\n"+
Note the \n (newline) characters at the end of each line. I've given a lot of thought to just #including external .js files to avoid this mess, but decided against it for the time being because it would create one more thing the end user would need to place in their scripts folder.
So, for now, I'm stuck with imbedding my scripts as strings. Unfortunately, I've used the " (double quote) and the \n (newline) characters liberally in all my scripts, and either of these characters will wreak havoc the continuity of the above formatting.
I easily search-and-replaced the double quotes with single quotes, but the newline character was giving me a bit of trouble. I used newlines in most of my prompt fields, and I didn't want to maintain two separate versions of my code.
After thinking about it for a while, I've found this workaround.
If the following Javascript were to be entered as a text string, the retChar variable won't terminate the line, but will display properly in the alert box.
var retChar = eval('String.fromCharCode(13)');
alert ( 'hello'+retChar+'there' );
The same could be done with the quote characters if you were backed into a corner, but it would be messy to use this solution for everything:
var quote = eval('String.fromCharCode(34)');
alert ( quote+'hello there' quote);
Anyway, If you're just reading this blog just to see what cool new scripts are out, and you couldn't give a crap about how it was coded, then don't worry, I think you'll find the next post a bit more rewarding. :)